Visão geral do componente Angular Query Builder
Angular Query Builder faz parte dos nossos Angular Components e fornece uma UI rica que permite aos desenvolvedores criar consultas complexas de filtragem de dados para um conjunto de dados especificado. Com este componente, eles podem criar uma árvore de expressões e definir condições AND/OR entre elas com editores e listas de condições determinadas pelo tipo de dados de cada campo. A árvore de expressão pode então ser facilmente transformada em uma consulta no formato que o backend suporta.
O componente IgxQueryBuilderComponent fornece uma maneira de construir consultas complexas por meio da UI. Ao especificar operadores AND/OR, condições e valores, o usuário cria uma árvore de expressão que descreve a consulta.
Exemplo do Angular Construtor de Consultas
Criamos este exemplo do Angular Construtor de Consultas para mostrar as funcionalidades padrão do componente Construtor de Consultas do Angular. Clique no botão de adição para adicionar condições, grupo "e", bem como grupo "ou". O agrupamento ou desagrupamento de expressões, bem como a reordenação, podem ser obtidos por meio da funcionalidade Arrastar e soltar.
Introdução ao Ignite UI for Angular Query Builder
Para começar a usar o componente Ignite UI for Angular Query Builder, primeiro você precisa instalar Ignite UI for Angular. Em um aplicativo Angular existente, digite o seguinte comando:
ng add igniteui-angularPara obter uma introdução completa ao Ignite UI for Angular, leia o tópico de introdução.
O próximo passo é importar o IgxQueryBuilderModule no arquivo app.module.ts.
// app.module.ts import { IgxQueryBuilderModule } from 'igniteui-angular'; // import { IgxQueryBuilderModule } from '@infragistics/igniteui-angular'; for licensed package @NgModule({ ... imports: [..., IgxQueryBuilderModule], ... }) export class AppModule {}Como alternativa, a partir da 16.0.0 você pode importar o IgxQueryBuilderComponent como uma dependência autônoma ou usar o token IGX_QUERY_BUILDER_DIRECTIVES para importar o componente e todos os seus componentes e diretivas de suporte.
// home.component.ts import { IGX_QUERY_BUILDER_DIRECTIVES, FilteringExpressionsTree, FieldType } from 'igniteui-angular'; // import { IGX_QUERY_BUILDER_DIRECTIVES, FilteringExpressionsTree, FieldType } from '@infragistics/igniteui-angular'; for licensed package @Component({ selector: 'app-home', template: ` <igx-query-builder #queryBuilder [entities]="entities" [(expressionTree)]="expressionTree" (expressionTreeChange)="onExpressionTreeChange()"> </igx-query-builder> `, styleUrls: ['home.component.scss'], standalone: true, imports: [IGX_QUERY_BUILDER_DIRECTIVES] /* or imports: [IgxQueryBuilderComponent] */ }) export class HomeComponent { public expressionTree: FilteringExpressionsTree; public entities: Array<any>; public onExpressionTreeChange() { ... } }Agora que você importou o módulo Ignite UI for Angular Query Builder ou as diretivas, você pode começar a usar o componente igx-query-builder.
Usando o Angular Construtor de Consultas
Se nenhuma árvore de expressão for definida inicialmente, você começará escolhendo uma entidade e qual de seus campos a consulta deve retornar. Depois disso, condições ou subgrupos podem ser adicionados.
Para adicionar uma condição, você seleciona um campo, um operando com base no tipo de dados do campo e um valor se o operando não for unário. Os operandos In e Not In permitirão que você crie uma consulta interna com condições para uma entidade diferente, em vez de simplesmente fornecer um valor. Depois que a condição é confirmada, um chip com as informações da condição é exibido. Ao clicar ou passar o mouse sobre o chip, você tem a opção de modificá-lo ou adicionar outra condição ou grupo logo após ele.
Clicar no botão (AND ou OR) colocado acima de cada grupo, abrirá um menu com opções para alterar o tipo de grupo ou desagrupar as condições internas.
Como cada condição está relacionada a um campo específico de uma entidade específica, a alteração da entidade levará à redefinição de todas as condições e grupos predefinidos. Ao selecionar uma nova entidade, uma caixa de diálogo de confirmação será mostrada, a menos que a showEntityChangeDialog propriedade input esteja definida como false.
Você pode começar a usar o componente definindo a entities propriedade como uma matriz que descreve o nome da entidade e uma matriz de seus campos, em que cada campo é definido por seu nome e tipo de dados. Depois que um campo for selecionado, ele atribuirá automaticamente os operandos correspondentes com base no tipo de dados. O Construtor de Consultas tem a expressionTree propriedade input. Você pode usá-lo para definir um estado inicial do controle e acessar a lógica de filtragem especificada pelo usuário.
ngAfterViewInit(): void { const innerTree = new FilteringExpressionsTree(FilteringLogic.And, undefined, 'Companies', ['ID']); innerTree.filteringOperands.push({ fieldName: 'Employees', condition: IgxNumberFilteringOperand.instance().condition('greaterThan'), conditionName: 'greaterThan', searchVal: 100 }); innerTree.filteringOperands.push({ fieldName: 'Contact', condition: IgxBooleanFilteringOperand.instance().condition('true'), conditionName: 'true' }); const tree = new FilteringExpressionsTree(FilteringLogic.And, undefined, 'Orders', ['*']); tree.filteringOperands.push({ fieldName: 'CompanyID', condition: IgxStringFilteringOperand.instance().condition('inQuery'), conditionName: 'inQuery', searchTree: innerTree }); tree.filteringOperands.push({ fieldName: 'OrderDate', condition: IgxDateFilteringOperand.instance().condition('before'), conditionName: 'before', searchVal: new Date('2024-01-01T00:00:00.000Z') }); tree.filteringOperands.push({ fieldName: 'ShippedDate', condition: IgxDateFilteringOperand.instance().condition('null'), conditionName: 'null' }); this.queryBuilder.expressionTree = tree; }A expressionTree é uma propriedade associável bidirecional, o que significa que uma saída correspondente expressionTreeChange é implementada e é emitida quando o usuário final altera a interface do usuário criando, editando ou removendo condições. Também pode ser subscrito separadamente para receber notificações e reagir a tais alterações.
<igx-query-builder #queryBuilder [entities]="entities" [(expressionTree)]="expressionTree" (expressionTreeChange)="onExpressionTreeChange()"> </igx-query-builder>Expressões arrastando
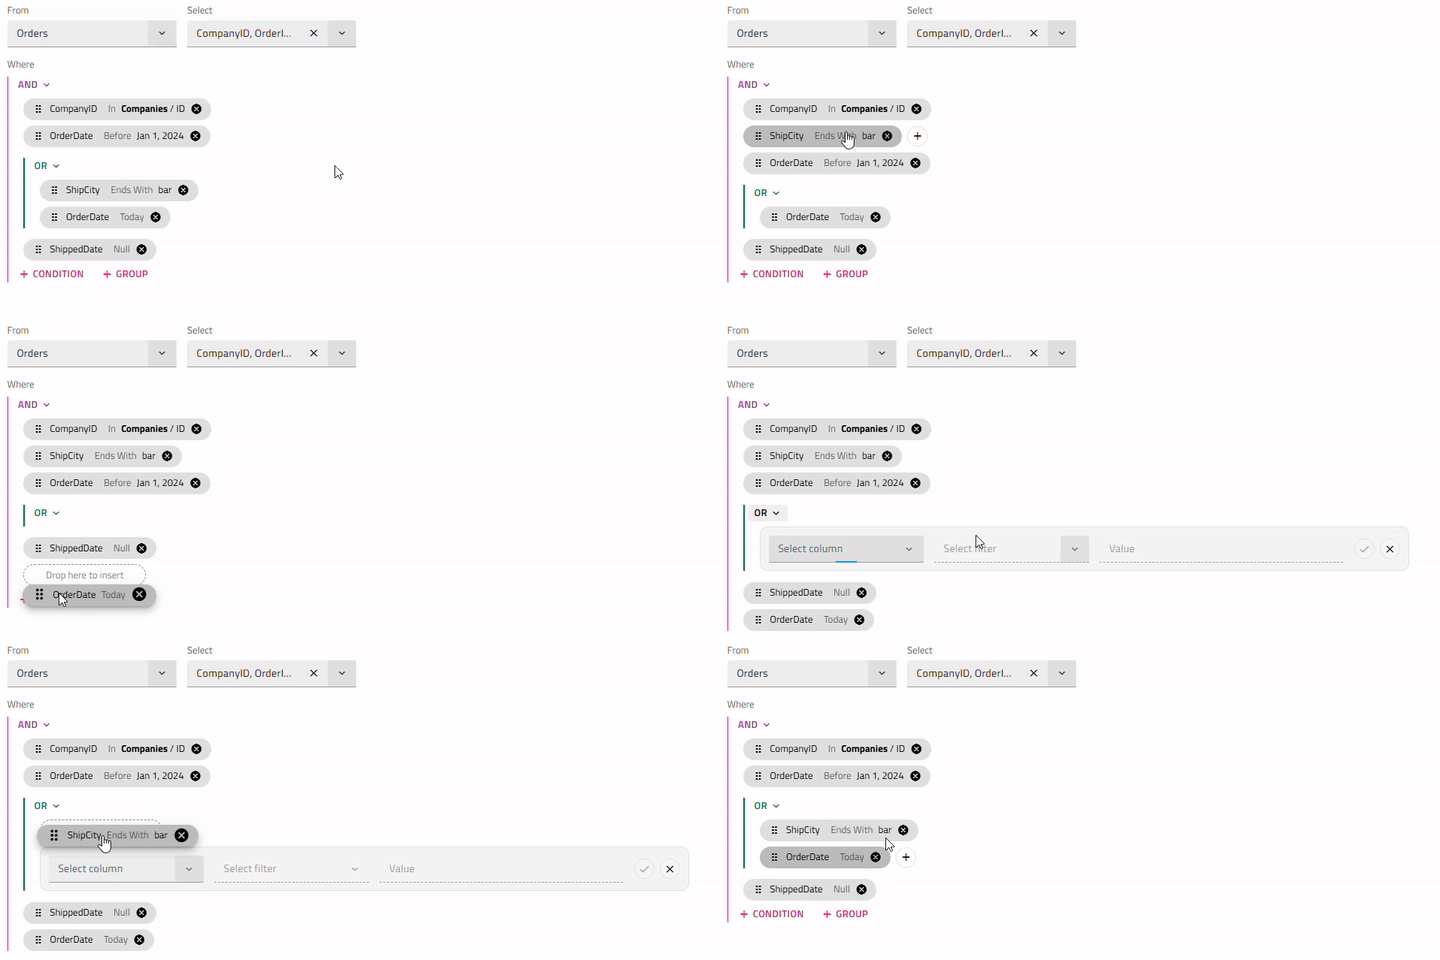
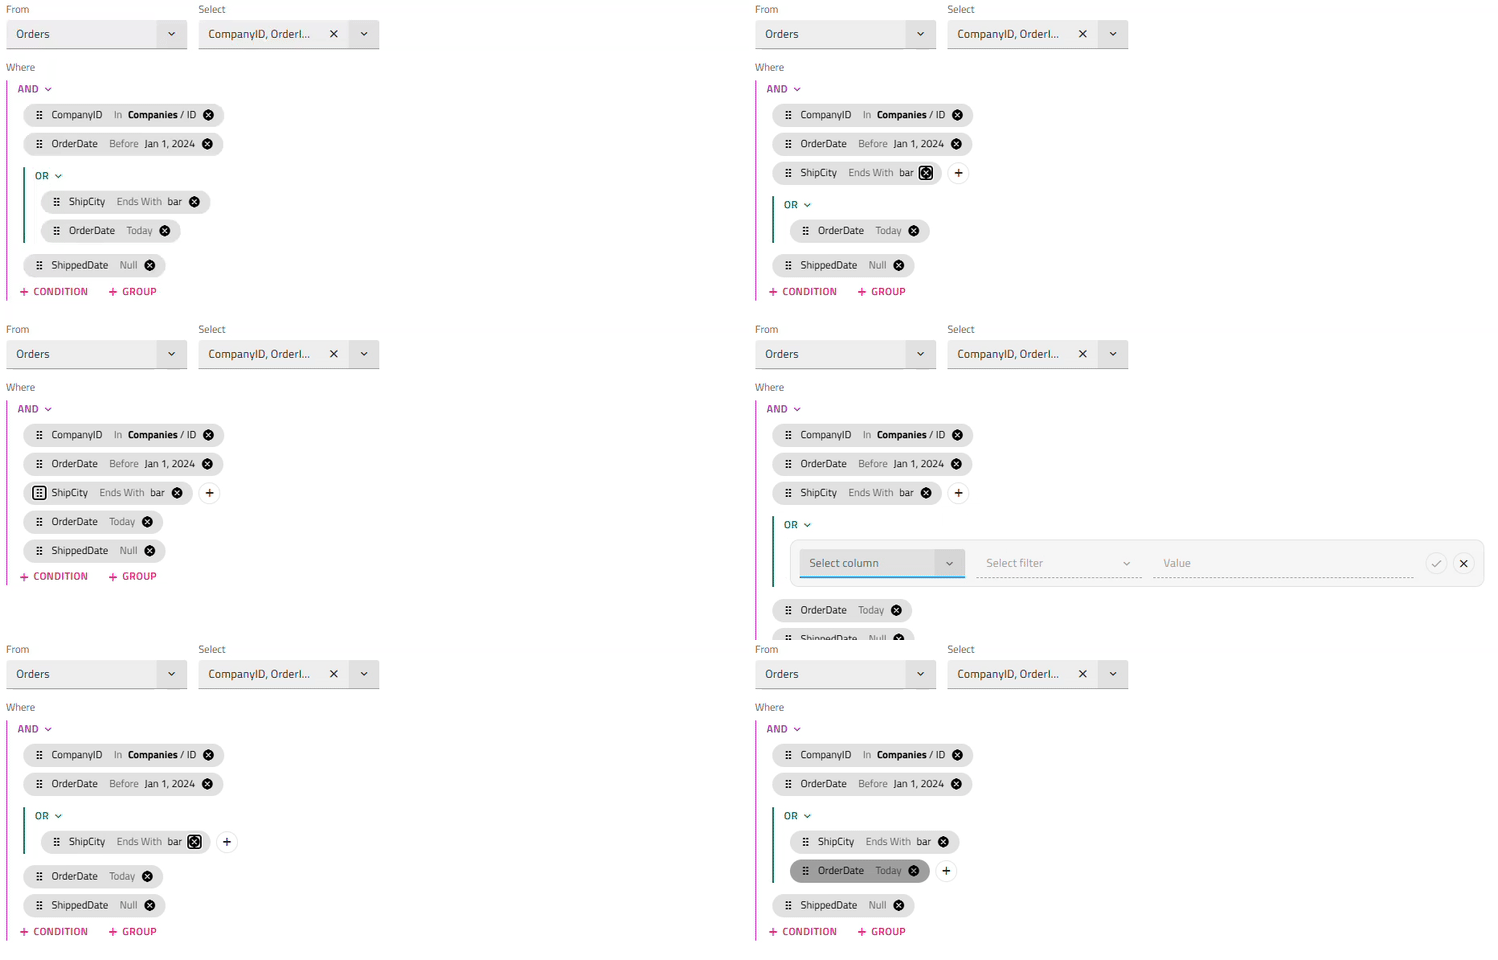
Os chips de condição podem ser facilmente reposicionados usando abordagens de arrastar e soltar do mouse ou reordenar o teclado. Com eles, os usuários podem ajustar sua lógica de consulta dinamicamente.
- Arrastar um chip não modifica sua condição/conteúdo, apenas sua posição.
- O chip também pode ser arrastado ao longo de grupos e subgrupos. Por exemplo, agrupar/desagrupar expressões é obtido por meio da funcionalidade Arrastar expressões. Para agrupar condições já existentes, primeiro você precisa adicionar um novo grupo através do botão de grupo 'adicionar'. Em seguida, arrastando, as expressões necessárias podem ser movidas para esse grupo. Para desagrupar, você pode arrastar todas as condições para fora do grupo atual e, assim que a última condição for removida, o grupo será excluído.
Observação
Os chips de uma árvore de consulta não podem ser arrastados para outra, por exemplo, do pai para o interno e vice-versa.

Interação com o teclado
Combinações de teclas
- Tab / Shift + Tab- navega para o chip seguinte/anterior, indicador de arrasto, botão remover, botão de expressão 'adicionar'.
- Arrow Down / Arrow Up- Quando o indicador de arrasto do chip está focado, o chip pode ser movido para cima/para baixo.
- Space / Enter- A expressão focalizada entra no modo de edição. Se o chip for movido, isso confirma sua nova posição.
- Esc- O reordenamento do chip é cancelado e ele retorna à sua posição original.
Observação
A reordenação do teclado fornece a mesma funcionalidade que o arrastar e soltar do mouse. Depois que um chip é movido, o usuário deve confirmar a nova posição ou cancelar o novo pedido.

Modelos
O componente Construtor de consultas do Ignite UI for Angular permite definir modelos para o cabeçalho do componente e o valor de pesquisa usando os seguintes nomes de referência predefinidos:
Modelo de cabeçalho
Por padrão, o IgxQueryBuilderComponent cabeçalho não seria exibido. Para definir tal, o IgxQueryBuilderHeaderComponent deve ser adicionado dentro do igx-query-builder.
Então, para definir o título do cabeçalho pode ser usado a entrada e passando o title conteúdo dentro do permite modelar o cabeçalho do construtor de igx-query-builder-header consultas.
O trecho de código abaixo ilustra como fazer isso:
<igx-query-builder #queryBuilder [entities]="this.entities"> <igx-query-builder-header [title]="'Query Builder Template Sample'"> </igx-query-builder-header> </igx-query-builder>Valor da pesquisa
O valor de pesquisa de uma condição pode ser modelado usando a igxQueryBuilderSearchValue diretiva, aplicada a um <ng-template> interior do igx-query-builder corpo:
<igx-query-builder #queryBuilder [entities]="entities" [expressionTree]="expressionTree"> <ng-template #searchValueTemplate igxQueryBuilderSearchValue let-searchValue let-selectedField = "selectedField" let-selectedCondition = "selectedCondition" let-defaultSearchValueTemplate = "defaultSearchValueTemplate"> @if ( selectedField?.field === 'Region' && (selectedCondition === 'equals' || selectedCondition === 'doesNotEqual') ){ <igx-select [placeholder]="'Select region'" [(ngModel)]="searchValue.value"> <igx-select-item *ngFor="let reg of regionOptions" [value]="reg"> {{ reg.text }} </igx-select-item> </igx-select> } @else if ( selectedField?.field === 'OrderStatus' && (selectedCondition === 'equals' || selectedCondition === 'doesNotEqual') ){ <igx-radio-group> <igx-radio class="radio-sample" *ngFor="let stat of statusOptions" value="{{stat.value}}" [(ngModel)]="searchValue.value"> {{stat.text}} </igx-radio> </igx-radio-group> } @else { <ng-container #defaultTemplate *ngTemplateOutlet="defaultSearchValueTemplate"></ng-container> } </ng-template> </igx-query-builder>Formatador
Para alterar a aparência do valor de pesquisa no chip exibido quando uma condição não está no modo de edição, você pode definir uma função de formatador para a matriz de campos. O valor de pesquisa e a condição selecionada podem ser acessados por meio dos argumentos value e rowData da seguinte forma:
this.ordersFields = [ { field: "CompanyID", dataType: "string" }, { field: "OrderID", dataType: "number" }, { field: "EmployeeId", dataType: "number" }, { field: "OrderDate", dataType: "date" }, { field: "RequiredDate", dataType: "date" }, { field: "ShippedDate", dataType: "date" }, { field: "ShipVia", dataType: "number" }, { field: "Freight", dataType: "number" }, { field: "ShipName", dataType: "string" }, { field: "ShipCity", dataType: "string" }, { field: "ShipPostalCode", dataType: "string" }, { field: "ShipCountry", dataType: "string" }, { field: "Region", dataType: "string", formatter: (value: any, rowData: any) => rowData === 'equals' || rowData === 'doesNotEqual' ? `${value.value}` : value }}, { field: "OrderStatus", dataType: "number" } ];Demo
Criamos este exemplo do Construtor de Consultas Angular para mostrar as funcionalidades de modelagem e formatador para o cabeçalho e o valor de pesquisa do componente Construtor de Consultas do Angular.
Estilização
Para começar a estilizar o Query Builder, precisamos importar o arquivo index, onde todas as funções do tema e mixins de componentes estão localizados:
@use "igniteui-angular/theming" as *;

// IMPORTANT: Prior to Ignite UI for Angular version 13 use:
// @import '~igniteui-angular/lib/core/styles/themes/index';
O Query Builder pega sua cor de fundo do seu tema, usando o parâmetro background. Para alterar o fundo, precisamos criar um tema personalizado:
$custom-query-builder: query-builder-theme( $schema: $dark-material-schema, $background: #292826, ... );Como temos outros componentes dentro do Query Builder, como botões, chips, menus suspensos e entradas, precisamos criar um tema separado para cada um:
$custom-button: flat-button-theme( $schema: $dark-material-schema, $foreground: #ffcd0f, ); $custom-input-group: input-group-theme( $schema: $dark-material-schema, $focused-secondary-color: #ffcd0f ); $custom-chip: chip-theme( $schema: $dark-material-schema, $background: #ffcd0f, ); $custom-icon-button: outlined-icon-button-theme( $schema: $dark-material-schema, $foreground: #ffcd0f, );Neste exemplo, alteramos apenas alguns dos parâmetros para os componentes listados, mas os button-theme temas chip-theme drop-down-theme input-group-theme fornecem muito mais parâmetros para controlar seus respectivos estilos.
Observação
Em vez de codificar os valores de cor como acabamos de fazer, podemos obter maior flexibilidade em termos de cores usando as palette funções e color. Consulte o Palettes tópico para obter orientações detalhadas sobre como usá-los.
O último passo é incluir os novos temas de componentes usando o mixin css-vars.
@include css-vars($custom-query-builder); :host { ::ng-deep { @include css-vars($custom-input-group); @include css-vars($custom-chip); @include css-vars($custom-icon-button); .igx-filter-tree__buttons { @include css-vars($custom-button); } } }Observação
Se o componente estiver usando um Emulated ViewEncapsulation, é necessário penetrate esse encapsulamento usando::ng-deep para estilizar os componentes dentro do componente do construtor de consultas (botão, chip, menu suspenso, etc.).
Demo
Observação
A amostra não será afetada Change Theme pelo tema global selecionado.
Você também pode otimizar o desenvolvimento do seu aplicativo Angular usando o WYSIWYG App Builder ™ com componentes de interface de usuário reais.
Referências de API
- API do componente IgxQueryBuilder
- IgxQueryBuilderHeaderComponent
- IgxQueryBuilderSearchValueTemplateDirective
- Estilos de IgxQueryBuilderComponent